Patbingsu 팥빙수


The cold weather didn't stop us from tasting the popular shaved ice dessert in Korea. A refreshing summer dessert often topped with frozen yogurt, ice cream, fruits and rice cakes. 


It has sweet red bean that Koreans love to put on their desert dishes.Available in different flavors. 

You'll definitely crave for this.


Melon flavor. 

Topped with frozen yogurt and almonds.


Serving costs ₩12,000.


Patbingsu experience will never be complete without sweet red beans.~


Cookie Mocha

Topped with vanilla ice cream with oreo cookie glazed with chocolate syrup.


This one is ₩15,000.


The serving is enough to be shared by two persons.


Overall, the patbingsu and the sweetened red beans were the best part! 

They also offer a custom-made shaved ice item with several toppings from their list, if you know what you like and want to create your own. I actually found the decor pretty minimal and simple and adorable. The bright colored chairs made the room pop and they were pretty comfortable too. I had a good experience here, and I wouldn't mind coming back to try the other menu items.


XOXO
Mikan 

Ulzzang Simple Make Up Tutorial

Hello everyone~ 
I'm back for another make-up tutorial. Yehey!
I recently noticed that my natural make-up tutorial earned a lots of views, so I decided to have follow up post for it!
So let's get started!!


Wanna create an ulzzang look like this....
If yes, then scroll down for instructions.


Etude fluffy marshmallow pudding as a simple bling in seconds with shadow makeup.

Use Product
       Etude No. 1 Cream Pudding  Diamond Shadow
       Amelie Nude All That
Kanebo Kate Super Sharp Liner
     Virtua Lancome's Mascara
Bourjois Brush tool 


Etude No. 1 Cream Pudding Diamond Shadow
 5g costs 7,500KRW


This is  how it looks like when applied to the eyes. Shimmer and glitter effect! 


1. Before applying make-up directly, please apply the base color.


Starting with your bare skin.


2. Apply the Etude House shadow on your crease not beyond the marker as seen on the photo below.


Tip: What I did is ~ I take little amount of shadow and place it on my hand. Everytime I apply the shadow on my crease, I dabbed my ring finger on my hand with eyeshadow. This is to create a natural look and  avoid having heavy and thick eyeshadow.


3. Please draw a line neatly on your upper lid and half of your lower lid.


 (I used Kanebo Kate Super Sharp Liner (brush pen).


4. Apply glitter shadow on your tear line.


5. Last step. Apply mascara on your upper and lower lashes. 


(I apply Virtua Lancome's Mascara.)


Five simple steps to achieve a clean, innocent ulzzang eyes.


This is all for now.
ByeBye.


XOXO
Mikan


Please don't forget to leave your comments.

Coat d' Carnation


Hello everyone~ 
Time is going by so fast!
I can't believe this day is over, and now it's FRIDAY again.. 
It seems like Friday was just yesterday. 


Anyway, I'm excited to share this to you guys.


Introducing Coat d' Carnation Cake  baked by Marine City Bakery.

Visited this small bakery in Busan and bought this beautiful cake with us back to the hotel. 


Cake presentation is simple yet the pink carnation flower inspired "topping" makes it look  so elegant. 

At first we thought it is not edible but we're wrong. haha ..sorry xD 


The cake is super moist and spongy. The cream strawberry filling is just the perfect sweetness that you can actually eat the whole piece without taking some of the cream out.


They have fast and friendly service. Great experience and definitely will go back!


If you are by any chance want to visit Korea or just counting the days left for your flight to the Land of the Morning Calm.


You can visit them at:

Marine City Bakery
Address: Woo 1-dong, Haeundae-gu, Busan 1410-2
Phone :051-747-5443


XOXO
Mikan


Lip Smacker Lip Balm

Hello everyone ~ 
Today, I will show you what I bought recently online. 
This product is on sale -so from 24,000KRW, it is only 7,000 KRW..BEST BUY!!!
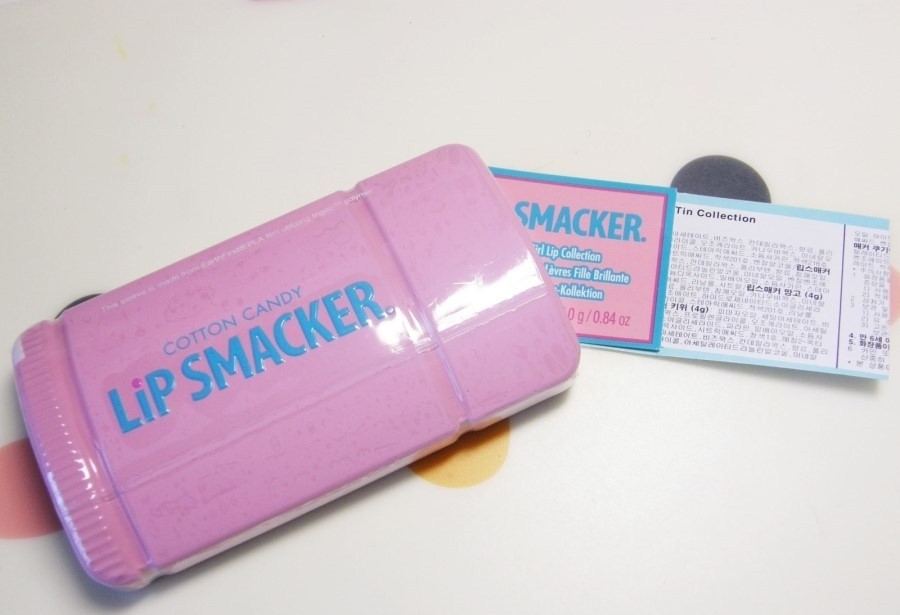
Other than that, it comes in a cute pink packaging/ casing. 

Arrived on the third day since I purchased it online. 
Shipped directly from Korea. 


This pink tin package contains 6 lip balms.


The product info & label is taped at the back. And anytime you would want to take it off, it's just so easy.


Pastel colors are so sweet~


They are in different flavors :

strawberry banana
 mango
 kiwi
 raspberry
 cotton candy
 cookies and cream

They all smell so sweet!


Personally, I'm very happy to purchase this  lip balm ~


This is not a regular sized lip balm. Lip balm "minis" as what I call it. But, length is the same with those regular lip balms. How nice!


Very economical! For only 7,000 KRW you got 6 lip balms in various flavors. YUMMY!
I haven't tried this on my lips yet. Well, I'm just too excited to share this you especially because of its cute pink packaging.


 XOXO

Mikan 


DIY: Bling! Bling!

Hello everyone ~ 


This is my first time to have a DIY post.
 I hope you will like it. 
But I'm pretty sure you'll love this especially if you fancy PINK !


Movin' on ------>  


Girls always love to collect accessories ---- from rings, necklaces,bracelets etc. 
Some usually buy in high-end boutiques to signature labeled stores,...which is occasionally expected to be
 E-X-P-E-N-S-I-V-E!!! 

Today, I will share to you how to make a cute fashionable bracelet on your own with some simple materials... 

Without breaking the bank and robbing your pockets!


Are you ready?


The final result of your handiwork will look like this..... DENG! DENG! DENG!.
.
.
.
.
.
.
.
.
.
.
.
.
.
.


In order for you to make this, you will need this following materials:


You can buy this in your local Arts & Crafts store.
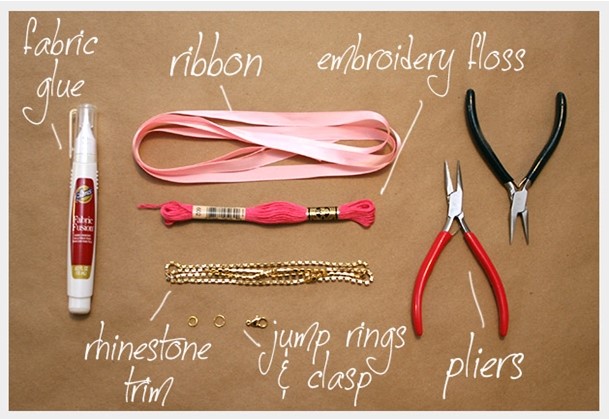


Let's get started!


1. Using a scissor and a plier, cut the rhinestone trim, ribbon and embroidery floss in same length.


2. Then, take the ribbon  and glue it using your fabric glue in the jump rings. Glue the embroidery floss next to the ribbon.


3. This is the important step!
Using your fabric glue, stick together the ribbon and rhinestone. 


4. This is the last step of the tutorial. Simply braid the three strands just like how you braid your hair. At the end of your braid, take the  jump ring and be sure to insert the clasp  and glue the "tip" of the strands together. And your done!


Useful tip!
 To avoid rhinestones from falling off from the ribbon. It is best to put glue on every rhinestone to secure it in place. It takes time but it will make your bracelet  last longer and more persistent especially if you like to wear it frequently.


You can now enjoy wearing this and matching it to your favorite dress.

 It is a budget saver and at the same time, it can be use as a present!

You can also make different styles and colors.

Let your creativity shine!!


I'd love to hear from you 
Please do leave a comment below! 


XOXO
Mikan~


© ✿ピンクの桃のプリン✿, AllRightsReserved.

Designed by ScreenWritersArena